

 Fall is my absolute favorite time of year! It makes me want to bake, decorate and craft all at the same time! I see a pumpkin and all of a sudden I need a Pumpkin Spice Latte and a whole bunch of glitter and I’ll whip up something amazing! Last fall I made a whole bunch of glittered pinecones for a magical tea party that I hosted for a bunch of women who were very dear to my heart. I saved the pinecones (thank goodness) and this year I decided I wanted to use them to create door hangers for my double front doors.
I struggle with how to decorate my front doors because there are two of them! It’s hard to figure out what I should put on them as decor. I feel like I need two of every decoration and that drives me crazy, especially when I want to make a wreath and know that I have to make two of them. I’ll let you in on a little secret, if you think I’m obsessed with glitter you are totally right, but I also have an obsession with wreaths as well. Call me crazy, but it’s true. When I see an adorable wreath on Pinterest or hanging on my neighbors’ front door, I get super excited, but then immediately annoyed knowing that I’ll have to double my efforts in order to put them on my front doors. Knowing the pain it is to duplicate decor for my front door, I was pretty excited when I came up with this idea to make quick pinecone wall hangers.
A lot of the stuff I create and do is born out of necessity or because it’s quick, easy, and is made from things I have laying around my house already. I know you may not have all these things magically laying around your house, but I’ll give you a good idea on how to locate the necessary items so that you can quickly make these too.
The supplies below are enough needed to make 2 door hangers. If you have only 1 door, you only need 10-12 pinecones.
Supplies Needed:
- 20-25 Pinecones (Small, Medium and Large Sizes and Shapes) - I found mine in my neighborhood under a couple different pine trees so I could have different shapes and sizes. You can also buy pinecones at any craft store.
- Mod Podge Gluing Medium
- Foam Paint Brush
- White Glitter – Large Flakes and Super Fine Flakes
- 1in Brown and White Striped Craft Ribbon – 1 yard (For Decorative Bow)
- 2in Red Wired Craft Ribbon – 3 yards (For Roses)
- Glue Gun - I personally like the HOT temperature glue guns, I feel like they glue stuff in place better than the low temperature ones.
- Glue Sticks
- Twine
- 2 Paper Plates
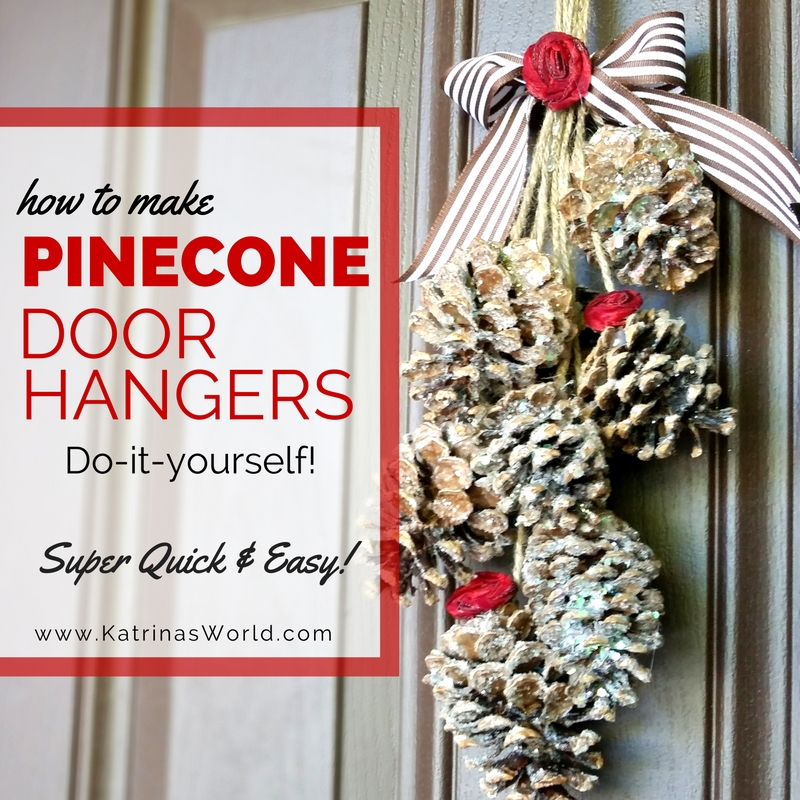
How To Make Glitter Pinecone Door Hangers:
- Choose a pinecone and paint it heavily with a layer of mod podge. Mod podge dries clear so don’t worry if it’s not perfect. I like a lot of glitter so I used a lot of mod podge.
- Over a paper plate, sprinkle the large flake glitter all over the pinecone and shake off the excess. Don’t worry if you don’t cover it completely.
- Sprinkle the super fine flake glitter all over the pinecone filling in all the spots missed with the large flakes. Cover it completely and shake off the excess. Set the pinecone aside to dry.
- Repeat the above steps for all the pinecones.
- While the pinecones are drying, cut twine 28 inches long. Cut as many twine pieces as you have pinecones for.

- Cut your 1 yard brown and white striped craft ribbon in half into two equal strips - this ribbon is for the decorative bow.
- Cut two 8″ strips of red wired craft ribbon – these are for the roses that go on the bow.
- Cut eight 6″ strips of red wired craft ribbon – these are for the roses that go on the pinecones.
- While you wait for the pinecones to finish drying, you can make the roses. Plug in your glue gun.
- Take one of the 8″ strips of red wired craft ribbon and fold one of the ends into each other and begin wrapping it around the center. Twist the ribbon as you go and continue wrapping it around the center to make the form of a flower. Place a small dot of glue on the side as you are wrapping around the edge to glue the flower in place. Continue wrapping, twisting, and gluing until you have used all the ribbon. When you reach the end you will glue the ends around the back of the flower to finish it off.
- Make all 10 roses and set aside. Each of them will look a little different and be a little different in size, which is ok!
- After all the pinecones are dry and covered with glitter select a larger one and turn it upside down so that the tip is pointing down. Find a small spot where one of the scales of the cone is open and squeeze in some glue.
- Take a piece of cut twine and secure one end it into the glue, this will hang your pinecone. Make sure you have enough glue to keep the twine secure.
- Add twine to all of your pinecones.
- Divide your twined pinecones into two equal piles of number and sizes.
- Start with one pile and one by one pick up a twined pinecone and start arranging them, holding them by the twine. After all have been arranged nicely tie a knot with all the twine at about a yard in length, or as long as you want them to be. The knot is how they will hang on your door, so you pick the length. After you tie off the knot, and are happy with the length, trim the extra twine ends.
- Assemble the second set of pinecones and repeat the above step, making sure they equal in length so they look good hanging next to each other on double doors.
- TIP: I hung my pinecone sets on hooks next to each other and assembled them while they were hanging. This helped me know exactly what they would look like when they were finished, and I also made sure they will even in length.
- Take your brown and white striped craft ribbon and tie a bow around the twine and slide the bow downward towards the cones to where they are almost touching the top cone of one of the sets of pinecones. Repeat with the other set.
- Take one of the 8″ roses and glue it right in the middle of the bow. Repeat with the other set.
- Take four remaining roses and glue them on the top of 4 of the bigger pinecones in one of your sets. Repeat with the other set.
- Done! Go hang on your front door! Way to go!

I Promise these are easier than you think! You can also choose different colors of ribbon for your bow and roses if you’d like. I used the colors I had already at home and they just so happen to match a pinecone wreath I made a few years ago that I hang near my front door. You can absolutely do it! Snap a photo if you decide to try them, I’d love to see how they turn out! Way to go momma!
